Details: Some people, believe it or not, have a hard time using DUPLO parts in their creations. Even though LEGO intentionally makes DUPLO parts to work with the smaller standard size parts, many people are either unaware of this or uninterested in taking advantage of it. On the other hand, though, there are people who are willing to take the most outrageous DUPLO pieces and find ways to use them. In one particularly dark time for the DUPLO line, LEGO tried to rebrand it as "LEGO Explore". When parents and grandparents who aren't familiar with LEGO got confused and stopped buying LEGO as a result, LEGO quickly changed back to calling it DUPLO on the box art (the writing on top of the studs still says "LEGO" instead of "DUPLO" though - that part of the change stuck). The Explore theme had some particularly unusual subthemes: Explore Logic brought us simple programmable toys, Explore Together brought us playsets designed for multiple people, Explore Being Me brought us (apparently) educational kits and a reissue of Primo, and Explore Imagination brought us both more "normal" DUPLO sets and a series of music-making kits. Needless to say, this last subtheme is where most of the fun was. The music-making kits seem to be one of those rare items that won't really connect to "normal" parts (you build onto the music-making kits by using plugs and cartridges specially designed for them). The controls for the music-makers could be a bit annoying - the Music Twister (used in this model) in particular only allow you to "twist" a tone while a pre-programmed song plays. Some people complain that this makes the Music Twister parts "useless" (or obnoxious, especially in the hands of a real toddler), but they are wrong - see, you can use it to build an awesome space colony! Just add silos, radar dishes, a spaceman, and greebling.
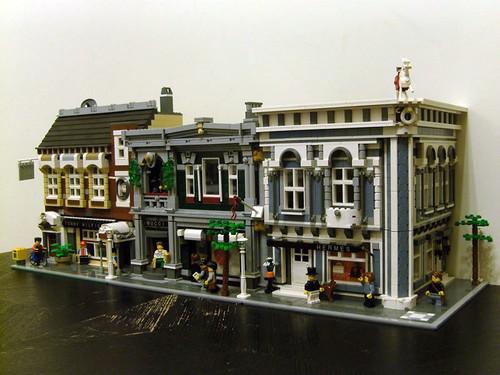
Details: At one point, there was a rumor that the next Cafe Corner style set would be sand blue. It's a shame that we didn't get a new kit in that color, but this model would be hard to top even if Jamie Berard (the designer of Cafe Corner, Green Grocer, and Grand Emporium) did pursue that color in an official set. While this whole model is fantastic, some highlights include the horse statue, the clothing racks, and the stunning architecture. The corner in particular is an interesting trick - instead of putting a full edge on the building with an angled doorway and windows, we get a column that just rounds things off. I'm pretty sure the texture there is achieved by use of click hinge bricks facing opposite directions. Corrected by a reader Wednesday morning: This effect is built sideways in two different directions - those tiles are actually attached to 1x2 slopes, and we're seeing the sloped surface face outward. A clever and very easy solution!
Details: Remember a few weeks back when I featured OK GO's Rube Goldberg Contraption? How about a few months before that when I mentioned Tora no Maki? Imagine combining the weight-powered mechanisms from Tora no Maki with a grand Rube Goldberg Machine in the style of OK GO's but less dramatic and entirely made out of LEGO. That's what this machine is like. In this video, though, you really get a chance to see what's what - after you see the machine run through once, you get to see outtakes edited in order of where they failed. The repeated close-ups on each section make it nice and clear what's going on in each part. Personally, I'm really impressed that no electricity was used - everything is triggered by weight. Another victory for the non-motorized mechanical world!
Details: Every once in a while, a fantastic model from somewhere else in the world reminds you of just how many great things you don't see because of language barriers. Sure, we all post photos to some of the same websites, but language barriers still prevent us from participating in certain contests or clearly communicating in words about various techniques. This particular contest (as explained by the builder in an English-language forum - the original contest was held on a Russian website, and as such info about this model is written in Russian) requires participants to design and build an original creation using only basic bricks and plates. At some level, it's pleasantly classic, going back to what people tend to think of as "pure" LEGO. On the other hand, it forces you to give up on many beloved building techniques. Or does it? - in this triumphal arch, we see bricks laid sideways (held in place only by friction and exact geometry), plates wedged between studs (with other small plates in between, only loosely attached), and plates partially connected on a curve to get that distinctive arch shape. This is extremely impressive for a model using only the most basic of LEGO elements!
Details: For many people the great taboo is trying to build a piece of furniture. Even fairly experienced builders who wouldn't think twice about building a giant sculpture often shy away from building furniture. That didn't stop today's builder, though, who paid top-dollar for thousands of shiny new bricks in black and white and glued them together to build a sturdy replica of a George Nelson Platform Bench. In context, it looks just like the "real" thing. There's also a stop-motion video of the table's assembly at the site listed above.
Details: Bill Ward brings us photos of the latest BayLTC layout. BayLUG is now gearing up for their area's first big LEGO convention, Bricks By the Bay, which will be held Friday-Sunday, April 9-11, 2010, at the Fremont Marriott Silicon Valley.
We know there are a bunch of recent posts missing - don't worry, they're coming (although a few may end up as short and rushed as this one). This one's for Sunday - expect to see last Friday, this past Saturday, and Monday come up later today.
Details: With all of the adults posting their own creations on the internet, it's inevitable that some of them are parents with kids who are also into LEGO building. What you don't expect, though, is that the kids' creations that a parent uploads will actually be better than many of the things adults are building. Case in point: this brilliant underwater scene. Several of the "manta warrior" characters from the new LEGO Atlantis theme are trying to catch a shark. The way they do it? By using bait that's a "human" minifig head attached to a stick of dynamite. Brilliant. Not to be outdone, there's also flawless landscaping, plenty of seaweed made from Bionicle spines (these were used as jungle greenery in some Indiana Jones kits) and even an evocative watery blue background.
This is the only photo of this creation, but the same builder also built a second scene (see the link above). Photo credit goes to Bart De Dobbelaer, the builder's father.
Details: In 2008, Duncan Titmarsh decided to build a sculpture of the classic 1978 LEGO set Castle. To LEGO fans, this iconic early design (the first set in the decades-long Castle theme) is simply known as "the yellow castle". This version, which debuted at the 6th Brickish AGM 2008, in Sheffield, 4-6 April 2008, is built to a scale of 6:1. Although enlarged versions of models from kits have been made by the company for promotional purposes before, this was apparently the first time that someone outside the company decided to recreate a vintage set on a larger scale. Not surprisingly, this has become an instant favorite in the AFOL (Adult Fan of LEGO) community, appeared at several other Brickish Association events, been featured on a variety of blogs and news outlets, and even made the cover of BrickJournal magazine (there's more coverage of both this castle and the set it was based on in that issue as well). The minifigs for this model were built by fellow Brickish Association member James Sutton (anyone have a link to his other work?).
Details: Here's yet another fantastic car - a spot on likeness of a Buick 1955 Century Riviera 4-door hardtop. This one's a bit drool-worthy just on parts (can you imagine being able to make something snazzy in dark red, chrome, and tan?), but there are also some techniques here that I don't believe we've seen before. Using the small horn element for door handles is ingenious, the working doors blend in perfectly with the mosaic pattern on the sides, the fender greebles came out right on both ends, and the use of clear cheese slopes for windshields came out much better than I'd expect. You can even spot a steering wheel inside the cabin. The working hood unveils an engine. The techniques near the front wheels aren't as obscure, but personally I really like how they capture the right look here.
Details: A bit of background: at LEGO stores (the ones owned by the company - you'll occasionally hear these referred to as "LEGO Brand Retail"), there are a number of semi-permanent displays. One of the more popular bits actually has nothing to do with kits available to be bought, but is displayed at kids' eye level in little round windows designed to look like LEGO studs. Those displays, which go around the entire length of the store (most LEGO stores in the US have standard fixtures and displays) feature a number of fun and goofy models at a number of scales. All of these displays are designed by the company, but since LEGO knows that there are plenty of LEGO fans around who would be happy for the privilege to build a fairly permanent store display, the LEGO company generally doesn't assemble the models. I, personally, have been able to attend two "build parties" where the display models were assembled for LEGO stores that hadn't opened yet. The recent remodeling of brand retail stores in the US (which also meant the end of the Window Into The Community displays where LEGO stores would showcase the work of local builders) brought in additional ribbon models in many stores. While these models are frequently photographed and used for inspiration, few people who have built these models have had the foresight to take photographs of the models before they were returned to the company and put behind the store fixtures. Today, I'm featuring this set of 8 of the models - there's only one photo of each, but you can see why these are such interesting and exciting designs.
Details:
In the interest of saving time (sorry for losing my regular schedule lately - I've been showing LEGO at public events and trying to generate building instructions), I'm actually just going to steal this description entirely from The NXT Step (check out the links above, though, to read about how to control this using Twitter):
Nokia have been running the 'PUSH N900 - MOD IN THE USA' competition that sought hackers and modders to push Nokia's new device, the N900, to its limits. Three teams of finalists have already been selected and are currently building their prototypes in time to present to a panel of judges at the CTIA Expo in Las Vegas next week.
Where does NXT come into this? Well, one of the three teams of finalists are developing a Twitter controlled robot, that uses the N900 as its 'brains' and Mindstorm NXT 2.0 for its body.
If you want to check out a bit more about the ''NIKO the N900 Robot' - here's their team page: http://blogs.nokia.com/pushn900/usa/category/niko/
Details:
This past weekend, as part of SXSW, TexLUG put on a LEGO show. By all accounts, it was a raging success. Photos have popped up in several places - here are a few of them (as usual feel free to send in links to more if you have them):
Details: The Pennybacker "360" Bridge in Austin, Texas, was re-created in LEGO form for this year's SXSW festival (more coverage of that coming Sunday - we're highlighting this one model separately today). A few minor modifications were made to the original design to make it fit a minifig-scale town layout better - the roadway was flattened, train track was added, and the asymmetric parts of the bridge were made symmetrical. This actually features a complete Technic support frame - a few thousand Technic half-pins were used to attach the dark red plates on top of the structure. The link above has all the information you need on this model, including photos of the model's construction and of the life-size bridge in Austin that this is based on. Here are some basic stats (for those of you not yet convinced):
Model Specs and Facts:
Start date: 31-January-2010
Date of completion: 13-March-2010
Nearly 14,000 pieces used
35-40 pounds in weight (estimated)
Total bridge length = 384 studs (aprox. 120 7/8 inches = 3.1 m)
This is an actual building in Zagreb, Croatia. Made in minifig scale, or approximate 1:37. Over 25 thousand bricks used in construction which spread over year and a half period. It was displayed on Brickworld 2009 in Chicago, in Zagreb Art Pavillion and Science and technology museum.
Details: Although LEGO has done a good job with their new official games line (NEW from LEGO® Shop LEGO Games. Play a new way.), they've avoided getting too close to existing games. Sure, some are slightly similar (Monster 4 is loosely based on Tic-Tac-Toe but much more fun, and Pirate Code bears some similarity to Mastermind), but I suspect that the licensing costs weren't worth it to do LEGO boards for established popular games (for the record, I'd be rooting for a LEGO travel scrabble and a LEGO Monopoly city). Today's featured model is an adaptation of the game Snakes and Ladders (also known as Chute and Ladders). Indiana Jones (famous for the line "I hate snakes!") is a natural choice for a character and thematic background. This version of the game allows for up to 6 players (3 of them can be Indiana Jones). Tiles make for great game spaces, and even work well with a bridge over water. As clever as the little snakes and ladders are, I think the real reason to recast this game in a LEGO format is the ability to add real landscaping. Now the ladders actually help you (technically your minifig) climb things and the snakes can really make Indy say "I hate snakes!"
Details: Color and texture can go a long way in making a model look realistic and properly aged for the context you're trying to create. Log bricks show up in the walls here, and a mottled use of colors (note the darker grey color mixed in on the walls) does a good job of making the castle look old and worn from a distance. Other highlights include upside-down boat studs as stones and stunning water detailing. The inside of this castle doesn't look bad, either - but why are there Star Wars tauntauns in there?
Here's a fun idea: what do you get when you mix a large, simple, and sturdy Technic frame, a spiffy PID controlled line follower, a 9V-motor controlled gripping device, and a winch setup that holds the gripper? You get this nifty crane setup. The construction of the top frame takes advantage of some of the more strangely shaped liftarms - note how the weight of the crane and cargo never makes the crane's frame bow. The "simple" line following portion of this is handles very smoothly - a sure sign that the program for it is using a PID control system (while proportional error correction is a bit more complex to program than the "classic project" style of zig-zagging line follower, I think that the performance improvement is worth it). You don't see string in many Technic and Mindstorms creations - truth be told, string is one of the few elements LEGO has a hard time manufacturing with a satisfactory amount of strength (I frequently use fishing line instead of official LEGO string) - but here, the 4 strings used as a winch have no problem holding up the gripper and moving it up and down smoothly. Personally, I'm a big fan of the way a 9V motor was used (with a visible 9V/NXT adapter cable) to control the gripping mechanism - when you just need to move something back and forth, you really don't need to use up one of the more expensive NXT motors (which come with built in rotation sensors).
This is just a fantastic design overall, and it's even more impressive that it doesn't rely on rare special parts - it's all fairly standard Mindstorms and Technic parts and mechanisms, arranged well and programmed perfectly. Many of the models I feature here aren't really something I'd try building myself, but I'm inspired to give this one a try.
Details: For those of you who haven't been following LEGO conventions in the United States, here's what this event is: Brickworld Indy is a show that has sprouted as a side event off of the Brickworld convention. Although Brickworld is an AFOL (Adult Fan Of LEGO) convention in Chicago, this invitation-only show is being held in downtown Indianapolis. Photos are dripping in slowly, but by all appearances the show was a success (as you'd expect from an invitation-only show). I'll be updating this page with coverage of the show as I find it (and you can send tips of show coverage to legomodeloftheday@gmail.com).
Details: Here's another for the "don't try this at home" category - building a sword out of LEGO. On second thought, I trust that you can behave yourself and I think we all can agree that this is one beautiful model. This was built for a recent Classic-Castle.com challenge that asks LEGO enthusiasts to try building life-size medieval weapons.
Details: This vaguely humanoid minifig-scale robot is a masterpiece. The techniques used here are fantastic. To recap: there are levers inserted into their bases upside-down to make the eyes. Battle droid arms (also used in some skeletons, railings, etc in recent kits) hold on to the lightsaber that holds the wheels, and connect to wrenches at the top. Those wrenches are connected to minifig hands which connect directly to minifig legs. Inside the legs we see the smaller clips that have been used as hands on some of the "robots" we've seen officially released (I'm thinking of the Exo-Force line in particular here). The use of 3x3 dishes in various double-sided set-ups looks great here as well.
Details: Here's an unusual way of building with DUPLO - building a small frame out of the smaller ordinary pieces, and using a Technic band to hold a layer of DUPLO on top without really attaching the pieces. The effect comes off surprisingly well. That small surprise is what makes this "spiff" style spaceship work well, but more traditional combinations of DUPLO parts and smaller LEGO parts show up here as well, such as taps inside of studs, and 'normal' bricks attached to studs on DUPLO bricks (yes - DUPLO was designed to do that all along, you should stop calling them "baby blocks" now). The curved DUPLO parts can be a bit more difficult to mix into creations, but I'd say this one pulled it off.
A word of warning - today's post is a bit of a stretch (it's only marginally LEGO-related) and some of the sites linked to from this post feature mild language. For obvious reasons, I can't control the level of insanity we see in comments on other sites. My choice of "making of" link is one of several, and some of the others contain some language that I try not to link to.
...but really, that's not what warrants a "don't try this at home". Read on to be inspired.
For today, here's something completely different - a large Rube Goldberg Machine that features a LEGO section. Later on in this video, we get to see a large racecar used as part of the contraption (in case this isn't clear - kids, DO NOT try this one at home. I cannot be held responsible for any smashed televisions, splatter-painted walls, messy warehouses, or other shenanigans inspired by this video). The LEGO portion of the machine features a Technic model of the racecar that appears later on. The car is triggered by a Power Functions-based launcher that is triggered by something flying across the room. Similarly, when the car is finished moving across the table with the LEGO section on it, it triggers the next mechanism by way of a flying rope - and then the next part of the machine actually plays part of the song. The LEGO whimsy here isn't strictly functional, though - in the picture below you can see the "concert" dome, where a colorful assortment of minifigures is watching a band perform. Not far behind that is a mosaic of the band's name (oh, did I mention this was a music video? The band wisely lets the machine steal the show).
The machine was created for the band OK GO (yes, of treadmill dancing fame, and yes, I know there's already a LEGO knockoff of that video). The machine was created by Synn Labs. Wired.com has a fairly thorough description of the process, although the nature of a project this large is that there are quite a few people out there who were involved in building the machine and are discussing it in various venues. I'm yet to see anything specific about the LEGO portion, but let's face it - this is just spectacular overall.
Details: Yes, I know there are a bunch of great specialized parts for building dinosaurs. I know that there are plenty of interesting ways to use Bionicle parts to get that organic effect. I think it's a bit more impressive, though, when someone manages to use a variety of common parts to build a realistic creature. This one isn't just beautifully textured with its clever use of various slope parts - it also has functional joints. Mecha builders have used all these techniques before - it's not exactly a shocker that pneumatic T elements and other pieces with a "bar" attached to them connect to the various parts with clips on them. Here, though, the effect is surprisingly organic, even though it usually looks more mechanical (and thus perfect for your average evil killer robot from the future). Another nifty trick is the way plates with an extra hole are used to construct the leg joints. Between the use of more conventional parts (even the horns are built out of smaller parts!) and the functional element of this model, this model is easily one of the most interesting dinosaurs I've seen built out of LEGO elements in a long while.
Details: This doesn't really count as robotics (there goes my "robotics Monday" theme), but it's some interesting food for thought that I think appeals to the same sort of Technic and Mindstorms sensibilities. We now have proof that it's possible to build a fully-functional orbital gearbox. Building gearboxes (also known as transmissions - they're primarily used in vehicles as transmissions even though they're now widely seen outside of complete cars) is one of the classic projects of LEGO Technic building - we first saw a linear transmission in a kit in the 1970's, and there have been countless improvements on the linear transmission concept over the years as well. Gearbox enthusiasts tinker for hours to determine just how many gears can be crammed into various set-ups, and a number of styles of transmission have appeared over the years. There have even been attempts at building automatic gearboxes and continuously variable transmissions. Sariel has previously built a 2-speed orbital gearbox, but there's a big difference between making a 2-speed model and making one that contains a decent selection of gears. The main appeal of using an orbital gearbox is the ability to shift gears without worrying about gears gnashing together in a potentially part-damaging way, so more gears makes the set-up more valuable. It's not quite as clear how this one works (not all of us document our creations as well as Sariel does), but I believe you can figure it out after going through the photos. A clutch mechanism allows the gears to be shifted, and the reverse is achieved by using a 16-tooth gear that's not firm on the axle to reverse the 16-tooth output gear's speed. I suspect that there might be a slightly less bulky way of getting 6 gear ratios into an orbital gearbox, but I'm impressed with the ingenuity of this construction already - it's an excellent use of those belt wheels with 6 pin holes. Now if only we could get more builders thinking of ways to construct things with exciting angles - it unlocks all sorts of new possibilities.
Details:
There aren't enough enormous DUPLO layouts out there. It's very strange - green is a far more common color in DUPLO than in the smaller LEGO bricks, and you can even buy (at fairly reasonable prices) a variety of shades of green in DUPLO. Bright green, lime green, and even the very rare medium lime color are plentiful in the DUPLO world (Little known fact: the piece LEGO makes in the most colors is the 2x2 DUPLO brick). The various rare colors that are readily available in DUPLO make DUPLO a natural choice for landscaping, but surprisingly few people take advantage of that. The DUPLO world also includes more animals (perfect for farms and medieval livestock) and as many specialized parts for Castle sets as you'll find in the "normal" kits. In terms of building techniques, I don't believe there's much here that we haven't seen before - but there's something to be said for having the ambition to take on a Castle layout properly (and with bricks in colors that allow for some truly accurate landscaping without breaking the bank).
Details: This model of the Governor's Palace in Williamsburg, Virginia is so full of exciting techniques that it is difficult to get a proper sense of scale looking at these photos. There's a very realistic brick texture visible here that is achieved by mixing 1x2 plates of various colors (with dark red and reddish brown going together very well). Of course, once you realize how small the "bricks" in the walls really are, the next question is "What's really in those windows?" The answer (clearer if you zoom in) is that they're the newer 1x2x3 and 1x2x2 windows, but instead of glass in the windows, there are 1x2 grill tiles mounted sideways behind them. The effect is spectacular - these really little windows really look like they have very tiny shutters behind them. That's not the only interesting parts use that makes it hard to tell what size this is - roofs are built out of cheese slopes, and the "grass" is actually made of leaf elements. Even the front door is an interesting trick - that's made with stacked hinge bricks. The rotunda makes use of the more well-known technique of using plate hinges to angle some of the windows.
Details:
This human-size arm is an extremely unusual feat. Done entirely with off-the-shelf LEGO Technic parts, it holds it's own weight and can maneuver well enough to pick up objects. You can get an idea of the strain on the parts by looking at the overhead view - extra battery packs are acting as a counterweight, and you can see how just one linear actuator holds the weight of the arm. The video is what really makes this model so dramatic - you can see that the parts have little problem handling the loads. Frankly, as nice of a model as this is, it almost feels like an advertisement for the newer Power Functions motors, linear actuators, and pneumatic parts. The older pneumatic parts show up in the hand itself, used as a way of closing fingers while limiting the amount of force used to grip. While the claim that this was built in one weekend might appear suspect, I'd argue that this is clearly an example of what you can do quickly if you've built up a decent collection of parts and have a good idea of each how to appropriate us the various elements. The use of the strong linear actuators in certain places allowed this arm to be much more stable and powerful than it would have been with geared joints or pneumatic actuators in the upper arm. Using pneumatics to limit the amount of force for the grip was a pretty clever trick, but not one quite as intuitive as using torque-limiting gears.
The important skill that allows people to build models like this quickly is knowing the strengths of each part. There's really no replacement for just messing around with elements you're not familiar with and seeing what they can do. That, kids, is what you should tell your parents when they ask why you never did finish building that big Technic kit.
No, seriously - I learned how to use pneumatic parts in the first place by "failing" to "correctly" assemble an 8868 Air Tech Claw Rig. Ironically, my parents weren't convinced it was a good idea until I built my first large mechanical arm - which couldn't be mounted in a human manner because pneumatics wouldn't be able to handle that much weight.
I apparently picked the AC Cobra 427 Sports Car as the model of the day just a few hours too soon to properly feature the roundup of entries into that LUGNuts building challenge. The official Animal Kingdom roundup is now live on the LUGNuts blog. There are, as always, plenty of interesting cars to be seen here, but for the sake of my arbitrary rules for how often to post here and how quickly I should repeat themes, I won't be featuring any others from this challenge.
Not that it'll pose any issue - next month they'll have another round of cars. I've featuredsome of their challenges here before, and there have been other great entries (that I haven't featured) in these monthly challenges as well.
Details: LUGnuts is wrapping up another challenge. Fittingly, this "Animal Kingdom" theme has brought out some of the most organic car models we've seen yet. This 10-wide car is a model of the ShelbyAC Cobra. The curvature came out strikingly realistic. Naturally, some studs-not-on-top trickery was required to get the shape just right - just in this front view we can see a section built sideways and another built upside-down. Some stickers were used to get the look just right - but it worked. There's even a model of the V8 engine under the hood! Pneumatic tubing rounds out the look of the driver's seat, and even the dashboard is properly detailed. Now if only it were motorized...
Details: Here's one last Olympic model for this year's games. While I had previously blogged the mascot/logo of the games in LEGO form, I haven't even mentioned the athletes. Apparently this whole juncture is some sort of athletic competition. This model, based on Polish skier Justyna Kowalczyk is a simply a fantastic miniland-scale figure. The Technic-scale skis (which also appeared in the 1993 "Ice Planet 2002" line) work beautifully here, as do the antennae as ski poles. The real coup, though, is how well the click hinges allow the figure to be posed. She actually looks like she's skiing downhill! While click-hinges are often dismissed as "juniorization" (something to make LEGO kits easier for very young children to assemble that doesn't add value to the creative building process) by long-time LEGO hobbyists (these hinges were new roughly 10 years ago), their ability to lock in place makes them perfect for creating sturdy angles. In this case, we see the click-hinges used for the legs and the older "finger" hinges used for the feet. The effect works perfectly here. It's a shame that we won't be seeing "finger" hinges manufactured again in the future - Steve Witt confirmed at BrickFair 2009 that they are permanently discontinued, and he cited quality control as the reason for change to the newer hinges. That is completely understandable - most of us who grew up in the 90's (when "finger" hinges were easy to come by) have seen a few break over the years. It's increasingly becoming clear now that adult resentment at their "juniorization" was misplaced - LEGO wasn't trying to make the part easier for children to use, and as we've seen with today's model, there are new things coming out of the adult LEGO fan community that couldn't have been built with the older hinges.
Details:
Yes, I know it's been just two weeks since I last featured an awesome cube solver. Sometimes you just need to find machines that can handle the rest of the Rubik's cube collection, though. The one can handle my 4x4x4 Rubik's cubes (except, of course, for the one rigged to explode, but isn't safety from that the main reason to let a machine solve this simple puzzle instead of solving it for yourself?). This machine can do more than just solve 3x3x3 and 4x4x4 cubes, though - it can also solve (as shown in the video) 5x5x5 Rubik's Cubes! You can see in the video the mechanism for allowing this - the cube is lifted to various heights to turn specific groups of layers, as compared to the simple twists of one-third of the cube that we're used to seeing. The design works for those three sizes of Rubik's cube without any modifications (minor modifications will allow it to solve 2x2x2 and 6x6x6 cubes as well). All of that, while amazing, is within the realm of things you could probably figure out how to build, given enough time and parts. This creation goes beyond that, though - much like the CubeStormer from two weeks ago, this is a purist creation that even uses the LEGO-branded Logitech QuickCam from the 9731 Vision Command set. Don't be fooled by the fact that we're seeing these put to good use now - the tech involved in that camera is now ten years old, and the SDK (Software Development Kit) used to program it outside of the graphical environment has not been maintained and is no longer supported. While putting the branded QuickCam to good use is increasingly becoming a difficult challenge (and an academic one, as so few people are big enough LEGO nerds to care if your LEGO robot is truly 100% LEGO down to the camera, and LEGO is yet to release a LEGO PC to truly finish the job), this model actually one-up's that too. The CubeStormer still communicated with the RCX. Now, the software challenge has been increased a bit - the computer interacts directly with the NXT based on the QuickCam input (the magic here is handled by C++). Successful projects that combine Vision Command and the NXT are few and far between, but this one is a clear winner.

 Some people, believe it or not, have a hard time using DUPLO parts in their creations. Even though LEGO intentionally makes DUPLO parts to work with the smaller standard size parts, many people are either unaware of this or uninterested in taking advantage of it. On the other hand, though, there are people who are willing to take the most outrageous DUPLO pieces and find ways to use them. In one particularly dark time for the DUPLO line, LEGO tried to rebrand it as "LEGO Explore". When parents and grandparents who aren't familiar with LEGO got confused and stopped buying LEGO as a result, LEGO quickly changed back to calling it DUPLO on the box art (the writing on top of the studs still says "LEGO" instead of "DUPLO" though - that part of the change stuck). The Explore theme had some particularly unusual subthemes: Explore Logic brought us simple programmable toys, Explore Together brought us playsets designed for multiple people, Explore Being Me brought us (apparently) educational kits and a reissue of Primo, and Explore Imagination brought us both more "normal" DUPLO sets and a series of music-making kits. Needless to say, this last subtheme is where most of the fun was. The music-making kits seem to be one of those rare items that won't really connect to "normal" parts (you build onto the music-making kits by using plugs and cartridges specially designed for them). The controls for the music-makers could be a bit annoying - the Music Twister (used in this model) in particular only allow you to "twist" a tone while a pre-programmed song plays. Some people complain that this makes the Music Twister parts "useless" (or obnoxious, especially in the hands of a real toddler), but they are wrong - see, you can use it to build an awesome space colony! Just add silos, radar dishes, a spaceman, and greebling.


