Posted by
Dan
at
1:49 PM
| Name of Model: A Box of Milk |
| Created by: Kosmas Santosa |
| Found at: https://www.flickr.com/photos/kosmassantosa/15857546889/in/photostream/ |
Details: 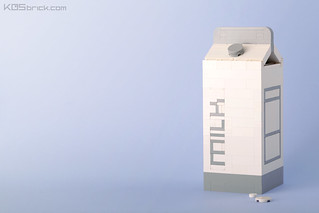 As part of the FOODcember 2014 building challenge, Kosmas Santosa built this very realistic bottle of milk...and mini chocolate cake, a chocolate cake with cherry and cream on top, a martini, fried chicken and french fries, and a kitchen to establish the theme for the month. That's not even all of his builds for this challenge, and it's only small taste of the delicious models in the FOODcember Flickr pool. As part of the FOODcember 2014 building challenge, Kosmas Santosa built this very realistic bottle of milk...and mini chocolate cake, a chocolate cake with cherry and cream on top, a martini, fried chicken and french fries, and a kitchen to establish the theme for the month. That's not even all of his builds for this challenge, and it's only small taste of the delicious models in the FOODcember Flickr pool.
This model isn't terribly complex from a technical standpoint, but it features great uses of lettering, hinges, and studs-not-on-top building (check out the boxes shown on the side). Then, of course, there's the use of a 1 x 1 round tile and 2 x 2 round tile to represent some milk that has spilled.
|
|
Posted by
Dan
at
6:11 PM
| Name of Model: Gingerbread House |
| Created by: Parks and Wrecked Creations |
| Found at: https://www.flickr.com/photos/legoland-bill/15849719540/in/photostream/ , https://www.flickr.com/photos/legoland-bill/15850940389/in/photostream/ , and https://www.flickr.com/photos/legoland-bill/16036296492/in/photostream/ |
Details: 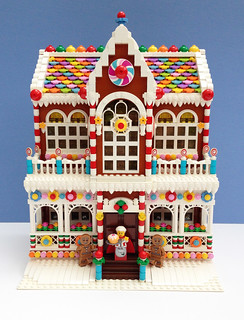 This beautiful gingerbread house is chock-full of an overwhelming amount of candy-coated details. It looks like the house is dark orange underneath the thick coat of candy, but that almost doesn't matter with all the other goodies packed in here. There's only three photos here, but they're clear enough to zoom in and get a good look. Some of the highlights: a mix of 1 x 1 and 1 x 2 plates with teeth to create icing-style cornice work, 2 x 2 tiles as Necco wafer-style roofing (I suppose they could be intended as a different candy, but it's definitely a great roof), swirl signal paddles on 1 x 1 round bricks and 1 x 1 round plates with open studs to decorate the railing posts, stacked 1 x 1 round bricks to make candy-cane lesenes, curved slopes for the icing snowbank, the standard 1 x 1 round plates as small candy trick, various reddish brown and dark brown tiles to make the chocolate bar door, and hypno disks and another printed 4 x 4 dish to represent swirl candies. Perhaps the best technique, though, is using trans-yellow bricks behind the windows to give the glass a sugary look when the building is lit up from the inside (visible in the second photo). This beautiful gingerbread house is chock-full of an overwhelming amount of candy-coated details. It looks like the house is dark orange underneath the thick coat of candy, but that almost doesn't matter with all the other goodies packed in here. There's only three photos here, but they're clear enough to zoom in and get a good look. Some of the highlights: a mix of 1 x 1 and 1 x 2 plates with teeth to create icing-style cornice work, 2 x 2 tiles as Necco wafer-style roofing (I suppose they could be intended as a different candy, but it's definitely a great roof), swirl signal paddles on 1 x 1 round bricks and 1 x 1 round plates with open studs to decorate the railing posts, stacked 1 x 1 round bricks to make candy-cane lesenes, curved slopes for the icing snowbank, the standard 1 x 1 round plates as small candy trick, various reddish brown and dark brown tiles to make the chocolate bar door, and hypno disks and another printed 4 x 4 dish to represent swirl candies. Perhaps the best technique, though, is using trans-yellow bricks behind the windows to give the glass a sugary look when the building is lit up from the inside (visible in the second photo).
There are even a few details here that are not immediately obvious in how they were built. Note how several flowers are sunken into the model so their stems don't pop out at you - these must be attached to something deeper inside the model. Then there are the 2 x 2 plates seemingly attached to fences - presumably there's a Technic axle behind those 1 x 1 plates connecting the 2 x 2 plates to something behind the fence.
Also perfect: the inclusion of Gingerbread Man collectible minifigures and Mrs. Claus from the Santa's Workshop set.
|
|
Posted by
Dan
at
9:54 PM
| Name of Model: Green Gables Stadium |
| Created by: Pete Strege |
| Found at: https://www.flickr.com/photos/redcokid/sets/72157630697303666# |
Details:  Pete Strege recently uploaded new photos of his spectacular Green Gables Stadium. Sure, you've seen this before in our Brickworld 2014 coverage, and it also was a highlight of Brickworld 2013 - but it's enough of a stunner to deserve a post of its own. There are many details to love here - the 24-sided architecture covering a 30-inch square (4 of the big grey baseplates) steals your eye at first, but there's also the removable (and well-angled) dome roof, the large minifig heads wearing hats, the dark green lettering in the front, the stunning use of color (sand green, dark green, medium dark flesh, and dark orange cover most of the model), and even a full interior (customizable for a few different sports, although the hat outside makes me think of this as a baseball stadium). Pete Strege recently uploaded new photos of his spectacular Green Gables Stadium. Sure, you've seen this before in our Brickworld 2014 coverage, and it also was a highlight of Brickworld 2013 - but it's enough of a stunner to deserve a post of its own. There are many details to love here - the 24-sided architecture covering a 30-inch square (4 of the big grey baseplates) steals your eye at first, but there's also the removable (and well-angled) dome roof, the large minifig heads wearing hats, the dark green lettering in the front, the stunning use of color (sand green, dark green, medium dark flesh, and dark orange cover most of the model), and even a full interior (customizable for a few different sports, although the hat outside makes me think of this as a baseball stadium).
Don't take my word for it - check out all 56 photos in the Flickr album, including pictures of the interior, work-in-progress pictures, and LEGO Digital Designer screenshots showing how the model was designed. The whole thing is beautiful, but I suspect we'll be studying that dome for years. |
|
Posted by
Dan
at
8:38 PM
| Name of Model: IMG_9532 |
| Created by: Dan (yours truly) |
| Found at: https://www.flickr.com/photos/dp3/15424910239/in/set-72157627265274741 |
Details:  Here's a quick look at one of my own recent builds - a microscale Pirate ship (or more accurately, an imperial galleon for the pirates to attack). The original idea was to create a ship that looked good, but was small enough to animate for Mini LEGO Con. That didn't work out so well, but the finished model was nice enough to add a stand (with water). At 8 x 16 studs, it fits into a Mini Con display, but is slightly larger than one of the BrickFair-styled tables. Here's a quick look at one of my own recent builds - a microscale Pirate ship (or more accurately, an imperial galleon for the pirates to attack). The original idea was to create a ship that looked good, but was small enough to animate for Mini LEGO Con. That didn't work out so well, but the finished model was nice enough to add a stand (with water). At 8 x 16 studs, it fits into a Mini Con display, but is slightly larger than one of the BrickFair-styled tables.
This was actually a very humbling model, since I ended up using quite a few pieces that I dismissed as unnecessary when they first came out. The base of the ship is a Bionicle Visorak foot - an "action figure part" you'll never use in-system, right? Two of the sails use a 1 x 2 plate with 2 clips (you'd think 2 1 x 1 plates with clips would do the trick, but this is actually sturdier). One of the sails uses a 2 x 2 tile with one stud in the center, which I remember saying was the equivalent of 3 jumper plates, but a plate shorter. Finally, a 1 x 1 round plate with hole (a part once exclusive to LEGOLAND for metal bracing and wiring) connects the tallest mast to the 1 x 1 round brick below it.
Kids, don't try this at home. You would not believe how difficult it is to connect a plate clip into the bottom of a 2 x 3 plate that already has two 1 x 2 tiles wedged into it. At least it looks good, but LEGO rightly considers that to be an illegal connection.
|
|
Posted by
Dan
at
3:16 AM
| Name of Model: Baymax |
| Created by: lisqr |
| Found at: https://www.flickr.com/photos/43699326@N00/15801224498/ |
Details: 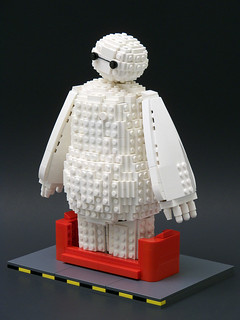 lisqr recently built Baymax as he appears in Disney's adaptation of Big Hero 6. The studs-out technique for building sculptures has gotten more popular lately - I still usually associate it with Schfio, one of the best builders currently working in that style, but it seems like everyone is trying their hand at it now that you can get travis bricks on the Pick-A-Brick wall at LEGO stores (and LEGO seems to be putting out more exciting studs-not-on-top elements in sets as well). Bruce Lowell is also rather famous for this style of building, and the head on this model is an obvious riff on his classic Lowell sphere (have I really not written about any of Bruce's models since 2007? Time flies). lisqr recently built Baymax as he appears in Disney's adaptation of Big Hero 6. The studs-out technique for building sculptures has gotten more popular lately - I still usually associate it with Schfio, one of the best builders currently working in that style, but it seems like everyone is trying their hand at it now that you can get travis bricks on the Pick-A-Brick wall at LEGO stores (and LEGO seems to be putting out more exciting studs-not-on-top elements in sets as well). Bruce Lowell is also rather famous for this style of building, and the head on this model is an obvious riff on his classic Lowell sphere (have I really not written about any of Bruce's models since 2007? Time flies).
The arms here are actually made from a great use of a different sculpture technique - loosely matching up various sizes of slopes and wedges. I believe I spy (please correct me if you think I'm wrong) a 2 x 1 curved slope, a 1 x 2 tile, and a 10 x 1 curved slope on each front edge, with a pair of 12 x 3 wedge slopes making the top and bottom of each arm. Even with all those slopes, it looks like the front and back edges are angled in further to get it to look just right.
...and I didn't even mention the great use of string on the robot's face yet.
|
|
Posted by
Dan
at
10:54 PM
| Name of Model: BCBS Round One: LoftBot |
| Created by: Lego Obsessionist |
| Found at: http://www.mocpages.com/moc.php/323135 |
Details:  Here's an oldie but a goodie from another contributor of ours here at LMOTD (someone needs to get more comfortable with blogging their own work...). Longtime readers will know I'm a sucker for anything combining themes in an unexpected way - the more themes and the less popular the themes are, the better. Here, we have a wonderful mix of DUPLO Bob the Builder parts with Bionicle and Technic elements. You know I love that. The head/cabin part from Lofty makes the head of the mech. The body is actually an expanding scissor lift, creating a great play feature beyond the decorative details. Clever parts usage such as the Toa torsos for legs are one thing, but this model also has an element of the old ship-in-a-bottle trick. Note how the interior of Lofty's head is filled in with Technic elements (it's more noticeable from the side). Here's an oldie but a goodie from another contributor of ours here at LMOTD (someone needs to get more comfortable with blogging their own work...). Longtime readers will know I'm a sucker for anything combining themes in an unexpected way - the more themes and the less popular the themes are, the better. Here, we have a wonderful mix of DUPLO Bob the Builder parts with Bionicle and Technic elements. You know I love that. The head/cabin part from Lofty makes the head of the mech. The body is actually an expanding scissor lift, creating a great play feature beyond the decorative details. Clever parts usage such as the Toa torsos for legs are one thing, but this model also has an element of the old ship-in-a-bottle trick. Note how the interior of Lofty's head is filled in with Technic elements (it's more noticeable from the side). |
|
Posted by
Dan
at
9:12 PM
| Name of Model: LEGO 31021 Alternate design |
| Created by: amaman_12 |
| Found at: https://www.flickr.com/photos/128971756@N05/sets/72157646800018133 |
Details: 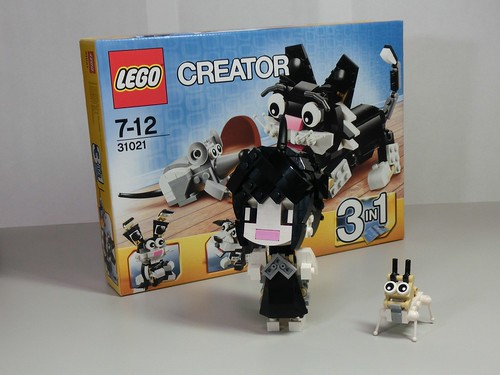 Here's another clever alternate build, this one using set 31021: Furry Creatures. Normally, you'd expect such an alternate model to have more in common with the main model from the set - in particular, I think most of us would be tempted to use the large eyes (printed on 2x2 round tiles) as the eyes for the doll. This time, though, we see a few 1x1 plates for the eyes and the bright pink 2-wide cheese slope used for the mouth - a simpler but adorable solution for building a character's face. I'm also loving the uses of a wedge slope for her dress and the tail element for a bit of hair out of place. Here's another clever alternate build, this one using set 31021: Furry Creatures. Normally, you'd expect such an alternate model to have more in common with the main model from the set - in particular, I think most of us would be tempted to use the large eyes (printed on 2x2 round tiles) as the eyes for the doll. This time, though, we see a few 1x1 plates for the eyes and the bright pink 2-wide cheese slope used for the mouth - a simpler but adorable solution for building a character's face. I'm also loving the uses of a wedge slope for her dress and the tail element for a bit of hair out of place.
Her pet is also a fun little build - a rare example of the bar-and-clip technique being used simply to reverse studs.
As an added bonus, the builder posted building instructions for the girl and her dog in this model's Flickr set. |
|
Posted by
Dan
at
6:45 PM
| Name of Model: Status markers for work. |
| Created by: Bret (starbeanie) |
| Found at: https://www.flickr.com/photos/starbeanie/15605055865/ |
Details:  This might seem a little quick and simple, but I like it. These use the older minifig-holding magnets (from when LEGO sold minifigure magnet sets where the minifigure was not glued to the magnet), and use tiles and minifigures to indicate different locations - specifically, places that Bret might be when he's not at his desk. It's a good excuse to bring some LEGO into a decidedly non-LEGO environment, and we never have enough good reasons to do that. It's different. It's clever. It's practical. It's functional. It's something I wish I had thought of first. This might seem a little quick and simple, but I like it. These use the older minifig-holding magnets (from when LEGO sold minifigure magnet sets where the minifigure was not glued to the magnet), and use tiles and minifigures to indicate different locations - specifically, places that Bret might be when he's not at his desk. It's a good excuse to bring some LEGO into a decidedly non-LEGO environment, and we never have enough good reasons to do that. It's different. It's clever. It's practical. It's functional. It's something I wish I had thought of first. |
|
|
|
 As part of the FOODcember 2014 building challenge, Kosmas Santosa built this very realistic bottle of milk...and mini chocolate cake, a chocolate cake with cherry and cream on top, a martini, fried chicken and french fries, and a kitchen to establish the theme for the month. That's not even all of his builds for this challenge, and it's only small taste of the delicious models in the FOODcember Flickr pool.


